componentkit 处理事件、state、componentcontroller
ComponentKit 处理事件、state、componentController
关于 ComponentKit
ComponentKit 是 Facebook 发布的一个受 React 启发而产生的 iOS 视图框架,最开始用于 Facebook 的 News Feed,现在已经开始作为整个 Facebook 的 iOS 开发框架使用。
更多:官方文档、一个中文介绍文档
首先需要明确的是 componnent 是一个逻辑层级,不会在屏幕上渲染出来,事件真正是被添加到 component 所绑定的 view 上,ck 只是将 view 的事件代理到了 component 上,这样我们可以通过 component 来处理事件
添加事件
添加时间可以分为 UIControlEvents 和 UIGestureRecognizer
UIControlEvents
声明如下:
// CKComponentAction.h
typedef SEL CKComponentAction;

CKComponentViewAttributeValue CKComponentActionAttribute(CKComponentAction action, UIControlEvents controlEvents = UIControlEventTouchUpInside);
可以通过方法声明看出来,如果不指定 UIControlEvents,那么默认是 UIControlEventTouchUpInside
使用:
CKComponent *action =
    [CKComponent
     newWithView:{
         UIControl.class,
         {
             // UIControlEventTouchUpInside
             CKComponentActionAttribute(@selector(handleControlEvent)),

             CKComponentActionAttribute
             (
              @selector(handleControlEvent),
              UIControlEventValueChanged
              ),
         }
     }
     size:{}];
需要注意的是,如果要 handle UIControlEvents 事件,那么这个 component 所绑定的 view 一定要是 UIControl 或者其子类
UIGestureRecognizer
声明如下:
// CKComponentGestureActions.h
CKComponentTapGestureAttribute**(CKComponentAction action);
CKComponentPanGestureAttribute**(CKComponentAction action);
CKComponentLongPressGestureAttribute**(CKComponentAction action);

typedef void (*CKComponentGestureRecognizerSetupFunction)(UIGestureRecognizer *);
// custom gesture
CKComponentGestureAttribute(
    Class gestureRecognizerClass,
    CKComponentGestureRecognizerSetupFunction setupFunction,  // 初始化函数
    CKComponentAction action,
    CKComponentForwardedSelectors delegateSelectors = {});
例子:
// CK convenience gesture creator
gestureComponent =
[CKComponent
 newWithView:{
  UIView.class,
   {
  		CKComponentTapGestureAttribute(@selector(handleGestureRecognizer)),
  		CKComponentPanGestureAttribute(@selector(handleGestureRecognizer)),
  		CKComponentLongPressGestureAttribute(@selector(handleGestureRecognizer))
   }
 }
 size:{}];
如果使用手势的话,就没有 UIControl 的限制了,只要是 UIView 就可以了。这里给 view 添加了 tap、pan、longpress 三种手势。
添加自定义手势:
// gesture setup function
static void createDoubleTapGesture(UIGestureRecognizer *gesture) {
    UITapGestureRecognizer *tap = (UITapGestureRecognizer *)gesture;
    tap.numberOfTapsRequired = 2;
}

// custom gesture
action =
[CKComponent
 newWithView:{
     UIView.class,
     {
         CKComponentGestureAttribute
         (
				UITapGestureRecognizer.class,
				createDoubleTapGesture, //初始化方法
				@selector(handleGestureRecognizer)
				// 这里没有写手势的 delegate,如果不写就默认没有
         ),
     }
 }
 size:{}];
处理事件
Component 是没有状态,不可变的,所以我们没办法改变 component 的状态然后去做刷新 UI 等等的操作,所以通常我们需要将事件代理到 comtroller 上去处理。 那么现在的问题就是我们怎么样将 component 和 controller 关联起来,官方并没有给出 component 和 controller 具体是怎么联系起来的方法,下面是我们在日常使用当中采用的一种方法:
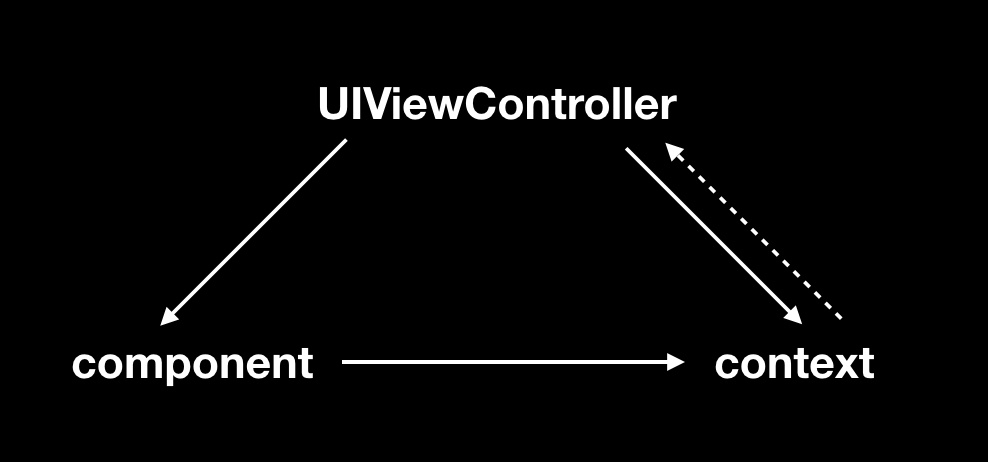
1. 创建 controller,请求数据,创建 context ,context 中持有对应 controller 的弱引用(context 是创建 component 必须的一个参数,具体可以参考 [在列表中使用 ComponentKit · YUI 的严肃文](https://linkexin.github.io/notes/%E5%9C%A8%E5%88%97%E8%A1%A8%E4%B8%AD%E4%BD%BF%E7%94%A8-ComponentKit))

2. 用 dataModel 和 context 作为参数创建 component,component 内部持有一份 dataModel 和 context 的引用

3. 当用户点击 component 时,component handle 到了对应的事件

4. component 通过本身持有的 context 拿到 controller 对象,并将事件传递给 controller
vc、component、context 三者之间的关系:
例子:
// event protocol
@protocol componentEventProtocol
- (void)handleEventWithModel:(id)model;
@end

// component’s handle event method
- (void)handleControlEvent {
    id model = self.model;
    UIViewController *controller = self.context.weakViewController; // 获取 controller
    if ([controller conformsToProtocol:@protocol(ZHDemoEventProtocol)]
        && [controller respondsToSelector:@selector(handleEventWithModel:)]) {
        [(id<ZHDemoEventProtocol>)controller handleEventWithModel:model]; // 调用 controller 相应的方法
    }
}

// controller confirms to the protocol
@implementation controller
-(void)handleEventWithModel:(id)model {
    // do something…
}
@end
上面说了,这不是官方的方法,所以可能不是很好。
state
上面的处理事件的方式是将事件传递给 controller 进行处理,但是有些逻辑其实只是 UI 层面上的逻辑,或者是一些 component 自己就可以处理的逻辑,并不是必须传给 controller 的。 上面提到过 component 是无状态的,我们的程序或者业务逻辑却是需要我们有状态的,那么就需要有个其他的什么东西来记录状态。State 就是 CK 提供给我们用来维护 component 状态的。但是这状态应该是单纯跟 UI 相关的状态,是 controller 不必要知道的一些状态。 state 是 component 内部对外不可见的一些实现细节,官方的一段解释:
Internal to the component, this holds implementation details that the parent should not have to know about.

The canonical example is whether some text should be rendered fully, or truncated with a “Continue Reading…” link.

This is a detail the parent component should not have to manually manage.
本质上,state 也是给 component 提供数据,供 component 渲染 UI 使用的
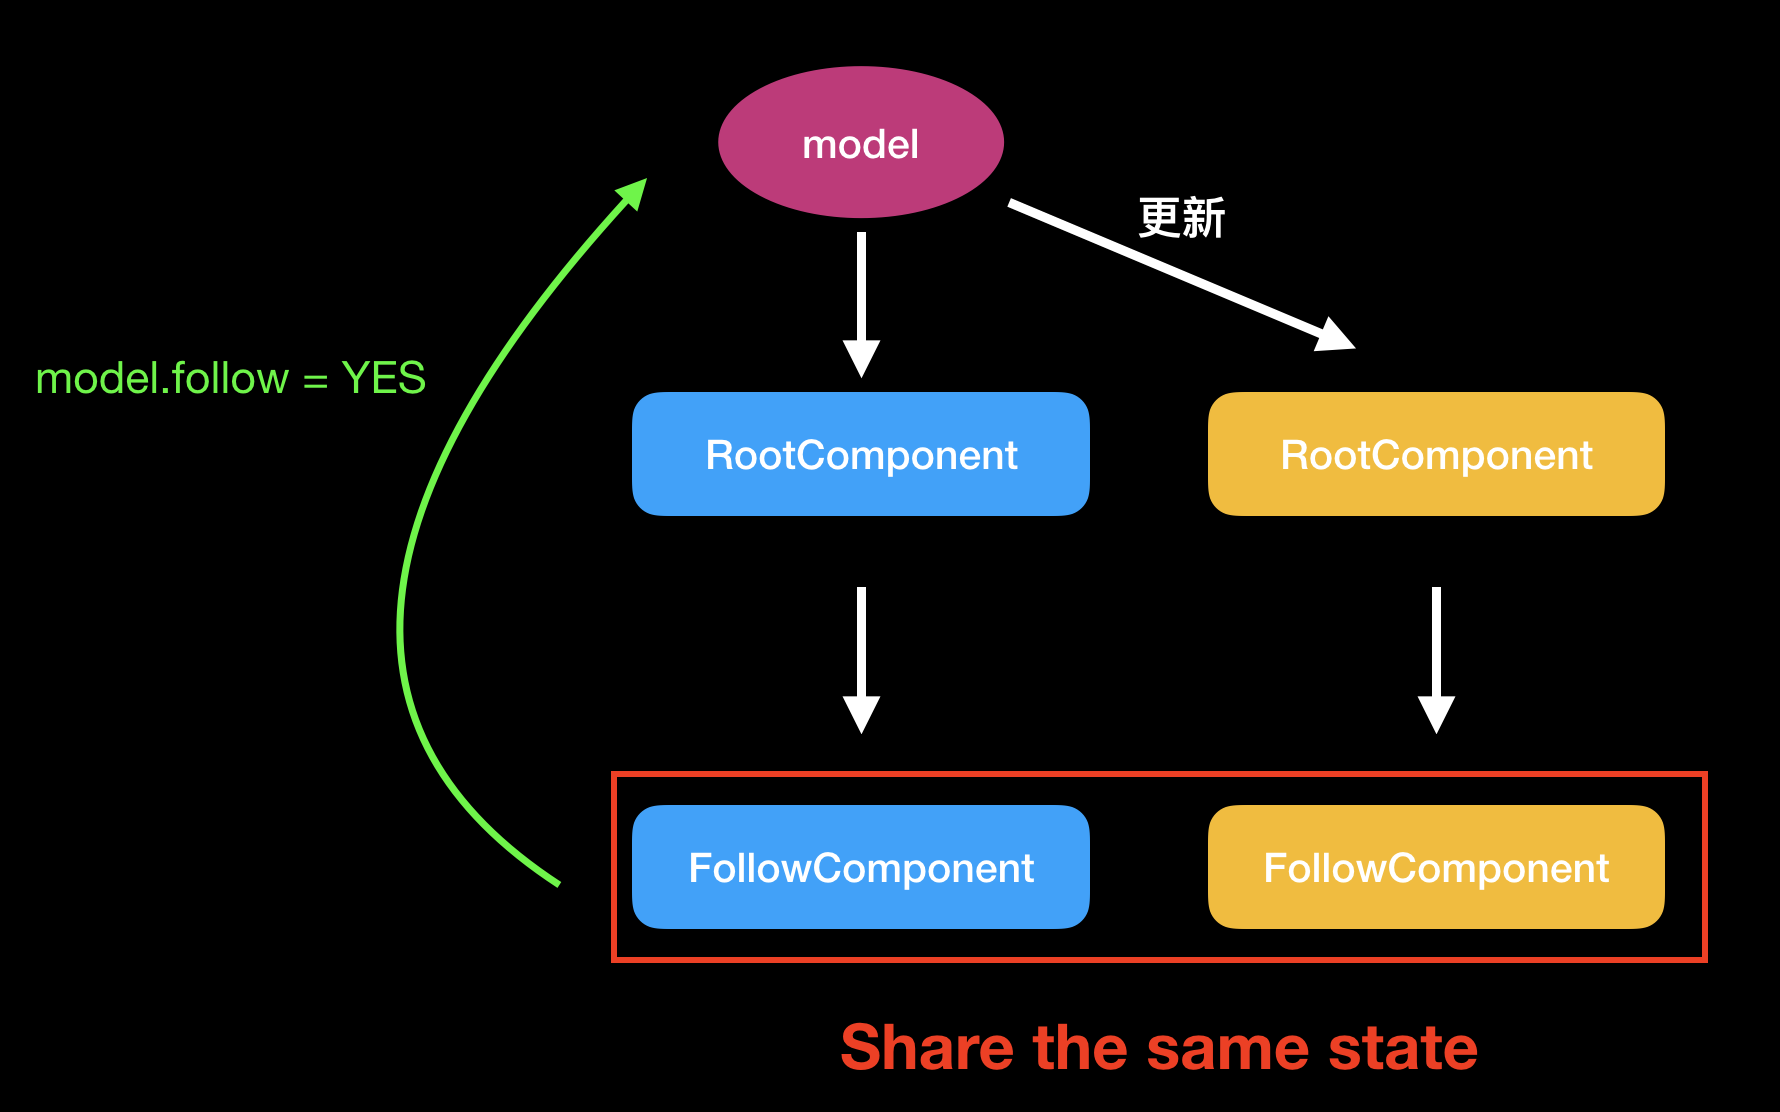
按照之前我们提到过的,刷新 component 以后,会重新再生成一个新的 component,新 component 不能访问到任何和旧 component 相关的数据的,通常我们选择的方法是通过改变 model 来同步状态,但是有时候这个状态只能跟 UI 相关(比如上面提到的 文字的展开收起状态),不应该在数据层中有相关的逻辑。那怎么办?这时候就是用到 state 的时候了。
State 可以在新旧 component 之间保持同一个状态:
怎么用
创建一个 scope,scope 是 ck 用来实现「多个 component 刷新之后变成多个实例,底层用来统一多个实例的数据」的一个东西,想要使用 state 一定要在创建 component 之前就实例化一个 scope,scope 的初始化需要 component class 和一个唯一的标识符 使用 scope 访问到 state 从而拿到 component 对应的状态
// inside component
+ (instancetype)newWithModel:(id)model context:(id)context {
    NSString *identifier = @"...";
    CKComponentScope scope(self, identifier); // 实例化 scope

    id state = scope.state(); // 通过 scope 拿到 state

    // ... other logic
}
同时 ck 提供了一个方法设置 state 的初始状态
/**
 Called to get the component's initial state; the default implementation returns nil.
 @see CKComponentScopeFrame
 */
+ (id)initialState {
    return @(NO);
}
现在我们可以初始化和拿到 state 了,那么怎么更新呢?我们需要用到 updateState 方法
// CKComponentSubclass.h
- (void)updateState:(id (^)(id))updateBlock mode:(CKUpdateMode)mode;
接受两个参数,一个 state 变化的block,block 将旧的 state 传递给你,并要求你返回一个新的 state mode 表示你要同步更新还是异步更新
例子:
// Usage
[self updateState:^id(id currentState) {
    BOOL currentStatus = [currentState boolValue];
    return @(!currentStatus);
} mode:CKUpdateModeAsynchronous];
下面模拟一个场景,一个关注按钮,区分关注和未关注,因为中间涉及到网络请求,所以还有一个 isFetching 状态,因为 isFetching 是一个只和 UI 有关的状态,所以不应该和 关注或未关注 混在一起,isFetching 就适合用 state 来存储同步
@implementation DEMOComponent

// override,设定 state 的初始值
+ (id)initialState {
    return @(NO);
}

+ (instancetype)newWithModel:(DEMOModel *)model context:(context *)context {

    // 使用 state 时必须要声明一个 scope
    CKComponentScope scope(self, model);
    id state = scope.state();
    BOOL isFetching = [state boolValue];

    CKComponent *followButton;
    if (isFetching) {
        followButton = [self followForLoading]; // 返回一个带菊花的 button
    } else {
        followButton = [self followWithFollowing:model.isFollowing]; // 返回一个写有「关注」或者	「已关注」的 button,并且绑定点击事件的处理方法为 buttonTapped
    }

	  // generate other compoments, suppose you name it stack
    DEMOComponent *com = [super newWithComponent:stack];
    com.model = model;
    com.context = context;

    return com;
}

- (void)buttonTapped:(id)sender {
    // 更新 isFetching 状态为 YES
    [self updateState:^id(id oldState) {
        return @(YES);
    } mode:CKUpdateModeAsynchronous];

    // 模拟网络请求
    __weak DEMOComponent *weakSelf = self;
    DEMOModel *model = self.model;
    dispatch_after(dispatch_time(DISPATCH_TIME_NOW, (int64_t)(2 * NSEC_PER_SEC)), dispatch_get_main_queue(), ^{
        __strong DEMOComponent *strongSelf = weakSelf;
        if (!strongSelf) {
            NSLog(@"self is nil");
            return;
        }
        model.isFollowing = !model.isFollowing;
        // 网络请求返回后,更新isFetching 状态为 NO
        [strongSelf updateState:^id(id) {
            return @(NO);
        } mode:CKUpdateModeAsynchronous];
    });
}
@end
运行一下会发现,button 一直转这小菊花,没有从「关注」变为「已关注」,并且控制台输出了「self is nil」,因为component 一旦刷新了以后,旧的 component 就不存在了,block 中访问的 self 就是旧的 component,所以这时候已经访问不到了。 鉴于上面这种情况,我们需要一个能够不受 component 生命周期限制的东西来获取 state ———— componentController
componentController
官方的一段话:
Components are **short-lived**, and their lifecycle is not under your control
When you do need an object with a longer lifecycle, *Component controllers* fill that role.
The component controller is created with the first component. When the component is updated, a new instance is generated but the component controller stays the same.
从上面的话和图中我们可以得知,不管这个component怎么刷新,对应的 componentController 总是同一个。
创建
定义一个 CKComponentController 的子类,并且命名为 「你的 componnent 名字 + controller 后缀」 注意我们不要自己去实例化 componentController,ck 会帮我们自动做这件事情。 需要搭配 scope 来使用
怎么用
接着上面的例子,我们定义一个 componentController,并完成我们想要做的事
@implementation DEMOComponent

// override,设定 state 的初始值
+ (id)initialState {
    return @(NO);
}

+ (instancetype)newWithModel:(DEMOModel *)model context:(context *)context {

    // 使用 state 时必须要声明一个 scope
    CKComponentScope scope(self, model);
    id state = scope.state();
    BOOL isFetching = [state boolValue];

    CKComponent *followButton;
    if (isFetching) {
        followButton = [self followForLoading]; // 返回一个带菊花的 button
    } else {
        followButton = [self followWithFollowing:model.isFollowing]; // 返回一个写有「关注」或者	「已关注」的 button,并且绑定点击事件的处理方法为 buttonTapped
    }

	  // generate other compoments, suppose you name it stack
    DEMOComponent *com = [super newWithComponent:stack];
    com.model = model;
    com.context = context;

    return com;
}
@end

@interface DEMOComponentController: CKComponentController
- (void)buttonTapped:(id)sender;
@end

@implementation DEMOComponentController
- (void)buttonTapped:(id)sender {
    DEMOComponent *component = (DEMOComponent *)self.component;
    // 更新 isFetching 状态为 YES
    [self updateState:^id(id oldState) {
        return @(YES);
    } mode:CKUpdateModeAsynchronous];

    // 模拟网络请求
    __weak DEMOComponentController *weakSelf = self;
    DEMOModel *model = self.model;
    dispatch_after(dispatch_time(DISPATCH_TIME_NOW, (int64_t)(2 * NSEC_PER_SEC)), dispatch_get_main_queue(), ^{
        __strong DEMOComponent *strongSelf = weakSelf;
        model.isFollowing = !model.isFollowing;
        // 网络请求返回后,更新 isFetching 状态为 NO
        [strongSelf updateState:^id(id) {
            return @(NO);
        } mode:CKUpdateModeAsynchronous];
    });
}
component 和 componentController 的关系是:component 并不能感知到它有没有 componentController ,但 componentController 可以通过 self.component 拿到当前的 component
component 中的响应链
得知了 component controller 这个东西的存在以后我们先来看看 component 中的响应链是怎么样的

1 The next responder of a component is its controller, if it has one.
2 The next responder of a component’s controller is its component’s parent component.
3 If a component doesn’t have a controller, its next responder is its parent component.
4 The next responder of the root component is the view it is attached to.
5 As normal, a view’s next responder is its superview.
6 Eventually, this will reach the same root view as the component hierarchy.
7 It’s up to you to manually bridge from the view responder chain into the component responder chain if desired by using CKComponentActionSend or one of the helpers described below.
参考
https://componentkit.org/docs/datasource-overview.html
https://componentkit.org/docs/responder-chain.html
https://componentkit.org/docs/component-controllers.html
https://componentkit.org/docs/lifecycle-methods.html